Tuesday 30 November 2010

How to make mega easy ice cream scoops

Hi everyone!

It's almost December now and proper winter has come to UK. It's been snowing today where I live and I think that this eveningg is the coldest one ever! You should see me now writing this to you: I'm wearing three layers of clothes and gloves! :D I live in a flat on the beach and almost everyone is jealous about that, but they don't realize how cold it's here in winter :) I'm really happy that I don't have to make anything from polymer clay because my hands could not cope with kneading it. But I still have some work to be done and today it was time to finish the rest of my ice creams. I've already made individual scoops and today I made scoops on waffle cones, and I decided that I could show you how to make them from air dry clay in a really easy way. It may take a bit longer than normal technique but you have a total control over the process. You can use this method with measuring spoon to make individual scoops as well, but I would like to show you that you don't really need it :)


The photos will be shown in kind of random order because I made two scoops on each cone and photos of the second scoop were just better :)
I also would like to apologize how dark they are but I usually make things in the evening and here in UK it gets dark before I finish work :( I tried to fix this problem with photoshop and hopefully you will be able to see everything.


So ffirst you have to make a ball shape from your coloured clay.


Here you can see that i attached it to already pre made ice cream scoop with deco glue.


Next you will need a piece of kitchen foil folder couple of times into a thin piece. The thickness will depend on how big ice cream scoop you want to make. The bigger, the thicker the foil piece should be, but it all depends how much define you'd like this scoop to be.
Using it make round creases in the clay, just like in the picture here. Try not to make one long line but rather more smaller ones. This will give you the basic texture of the scoop and most of the times, depends on what effect you will get (I get different every time :) it could be enough. If not, you can use another piece of kitchen foil in a ball shape and just dab slightly the surface of the clay.
Next you will need a pointed tool. You can use a needle tool, dart or just a toothpick. Whatever you prefer :)

Using it, rip a random pieces from your clay leftovers.

Try to get fluffy bits and stick them gently together. It doesn't really matter if they are perfect or not. Just try to avoid big chunky pieces.

I'm not shure if you can see it in the photo, but I usually apply a bit of glue on the scoop and then add fluffy fluff onto it :) to make sure that it wont fall off.

I would recommend using glue for larger scoops and the ones that will be bashed around a lot :) . I don't usually use glue for mini scoops.


And here you have ready made ice cream! :)

I've tried many method of making scoops before and I find this one the best. I don't have to care about clay sticking to measuring scoops and I can create scoop in any shape and size I want.

I also like the fluffiness of the edges because I've always had problems to create this realistic look using measuring scoops.

You will have to varnish it after it dries out and then you will be shure that these fluffy bits won't come off.

I hope you enjoyed this mini tutorial and I'd be happy to hear what you think about this method. If you have any questions don't hesitate to ask :)

And thank you for visiting my blog!

Saturday 27 November 2010

Cream puffs tutorial

Hi everyone!

I think that cream puffs are one of the easiest and most adorable deco sweets to make. I said easy because now I know how to make them and I would like to show it to you, so you could make your own ones :)

Cream puffs, in UK called profiteroles, are just little puffed pastries filled with cream, and usually topped with chocolate glaze. Most of you know them very well. They are one of the most popular desserts here in UK, especially on Christmas, so I thought that I will make some for my market day.

I made couple of bread rolls in the past so now I thought that I could make cream puffs, as they are very similar to bread rolls. Well, I was wrong. Bread rolls have more or less symmetrical pattern on the top, whether cream puffs are more chaotic. In my opinion, off course :)
I tried to search for a tutorial on how to make them, but I couldn't find it. Maybe it's too obvious for many how to make them, but it wasn't for me. And so I created my own way of making them and here you have my little cream puffs tutorial :)


First you have to colour your air dry clay with acrylic paint off course :) I used a bit of ochre colour.
Then you make a little ball in a size of cream puff you want to have.
Divide it in four more or less similar size parts. I wanted to have rather simple cream puff so I divided it in four. They don't have to be perfect ball shape, because cream puffs are not perfect when they raise in the oven :)


Take three balls (I chose bigger ones) and join them together.

Put fourth one on the top and squeeze them gently together.

Try not to squash them and try to keep it in shape.

I also joined them together underneath, by smudging the creases, so it wouldn't fall apart.


This is difficult part for me as I don't know how to explain it properly in English :D

Using pointed tool (I used knitting needle (???) in small size) smudge and dab the creases, trying to separate the parts a little.

(It's very similar process to making macaroons  I think.)


And here's the easy part :)

Using rough brush (I used nail brush as it's harder that toothbrush) make the texture on the dough.

Don't push too hard and if your creases become smaller, repeat dabbing them and then use brush again until you'll get desired look.


After your cream puff will dry it's time for baking! :) I used raw sienna colour and a make up sponge.

You can just paint them once but I like to do it in two parts. First I use wet sponge with a little bit of paint. I paint the whole dough and I get kind of light coloured background.
After that I use rather dry part of the sponge with more paint and gently apply the paint on the higher parts of the dough.

One tip for you is to dab the sponge with paint onto the piece of paperfirst and then on the cream puff, to get even colour on the dough.
After the puffs are completely dry, you can cut them in the half and fill with cream :)

I hope this tutorial will help some of you and you could make your own Christmas cream puffs! :)
If you have any questions please feel free to ask.

And thank you for visiting my blog! :)

Friday 26 November 2010

Birthday gifts

Hi everyone!

Market day is getting closer and closer and I've been busy trying to get everything done on time, but I still could find some time to make birthday gifts for my boyfriend's sister and his niece :)


I wanted to make something sweets related for my boyfriend's sister, but she's older than us and more serious :) therefore I've tried to create something elegant and "lady like", and so I made these two cute picture frames. I didn't make frames off course, I bought them in Ikea, my favourite store :D To make these flowers, I used Soft Fimo and this was the first time I worked with it. I don't think I will come back to normal, classic polymer clay as this soft version is much easier to work with and hands don't hurt so much :D

My boyfriend's niece is nine years old so I could let my imagination free and make something deco sweets related. I decided to make this sweet clock, partially because I was wanting to make clocks like this for long, long time and finally now I had a chance to do it.

The clock is from Ikea too and it's quite small, about 10cm tall and it was made from transparent plastic.
I wrapped it in air dry clay, "baked it" and then applied all the cream and deco.

For anyone who'd like to make clock like this I have one advice: varnish the clock dough before applying cream and deco. I used pastel powder to bake it and I had to be really careful when varnishing, because the powder mixed with varnish was getting onto the cream, making it brown.


As a deco I used my old sugar coated polymer clay cookie and polymer clay strawberry slices. The white chocolate and pink candy are also made from polymer clay (candy is made from translucent mixed colour polymer clay). 

The rest of the deco is made from air dry clay and cream itself is a Galeria's modelling paste, which was varnished twice.

And here I had to point out something. I've never used modelling paste in such a big quantity and I didn't know that it will take around four days to dry out. Being honest, I had to help it with drying using a hair dryer... Yeah, now I know that you can do it, just use the lowest setting, so you wont get everything burned :D Well, it won't burn but it might wrinkle or something :)

I wanted to add some strawberry sauce on the top of the ice cream scoop and I used mix of resin and glass and acrylic paint. I did it when I made my chocolate sundae with the same technique, and here you can see that the sauce has spread all over the scoop :( Disaster but my boyfriend's niece didn't notice anything :D I can tell all of you in a secret that I've discovered how to make you own sauce and I will share it with you soon :)


The cookie behind is meant to be a "Party Ring" and some of you living in UK know this type of cookie :) This is a gift for a little English girl and I wanted her to have sweets on this clock that she could recognize, not some French fancy sweets that even I don't really know :D


Overall I'm quite happy with this clock and I hope that she will like it too. I want to make more of them and sell them on the market day. I have couple donut shaped ones, and also one cookie and one pastry shaped :)

I'm really curious what you think about it :)
Share a comment!
And thank you for visiting my blog!

Tuesday 23 November 2010

Blue wedding cake phone charm treasured!

Hi everyone!

This will be a quick update :) I have added couple of new items to my Etsy shop last night, pink and blue wedding cake phone charms, and guess what? The blue charm got noticed straight away and it's been added to Etsy treasury! How sweet! ^_^'

This treasury is called "Don't be blue..." and it featured lots of beautiful items. You can check it out clicking on the image below. Have fun  and thanks for visiting my blog! :)

Monday 22 November 2010

Work in progress - Chocolate sundae

Hello again!

I've mentioned in my last post that I'm currently experimenting with resin making jellies. I tried to use resin for something different, this time to make deco sauce. I've tried epoxy resin glue before to make sauce (well, once) and maybe because I bought cheap one, it didn't really look good. It became opaque and not transparent after mixing it with acrylic paint. My crystal epoxy resin was my next choice. I mixed it with acrylic paint and waited couple of hours until it became thick enough, and used it on my first ever sundae photo holder :) 


For a whip cream I used silicone and modelling paste. I put silicone inside of the glass and modelling paste on the top, just to be shure that deco won't fall off and I will be able to varnish it after drying. 

I must say that this resin sauce worked well inside of the glass, but it wasn't thick enough to stay properly on the top of sundae. You can see that it has "melted" on top of the ice cream scoop and it doesn't look like a zig zag anymore :(


But there are some things I am proud of, like my almond pieces which I made using mix of transparent and normal polymer clay :) I didn't want to spend much more money on grace or modena clay to create this semi translucent effect (which is required to make proper nut pieces, I think). I made a long cane, baked it and then sliced it just like you slice it for banana pieces.

I also ordered some custom made stamps with my logo and some extra ones for special occasions :) And this chocolate piece in the back is made using texture stamp for metal clay. Yes this is my next crafting idea to start making silver clay jewelery, but so far I'm too busy with making these clay little (and not) babies.

I hope you enjoyed reading this and thank you for visiting my blog!  :)

Wednesday 17 November 2010

Blue heart cookie charm featured on Etsy treasury!

Hello everyone!

I'd like to share with you happy news. My blue heart cookie bag charm is featured on Etsy treasury created by Amaranthopulent. The theme is "Gifts for girls" and she features lots of beautiful items there. You can visit her treasury just by clicking on picture below :) Have fun!

Tuesday 16 November 2010

Cookies and jellies


I'm back again! :D Just for a little bit to show you some quick photos.

I finished work a bit earlier the other day and I decided to play with resin :) I've always wanted to make little jellies and these little babies are my first ones that came out pretty well. I used normal silicone ice/jelly mould and glass paint. The mould itself is not smooth so my jellies look a bit frosted. I got the parcel from Japan today with different smooth jelly moulds so my next jellies will be shiny :)
I don't know what I'll make from them, maybe fridge magnets...


The next thing I've been working on were cookies and biscuits. I need a lot of them so I've made different types, here you can see only one and some wafers for ice creams. I've used makeup sponge to "bake" them and I must say that I don't know how I could live without it before! It's so easy to shade things with it and it creates totally different look than brushing with pastel powder. If anyone's reading this is just starting to make deco sweets, makeup sponge is a must! Believe me, it will make your life much easier :) .


Some of you know that I've tried to make whip cream from fimo air dry clay before, but I failed. Well I tried again :) I added less water and I made "swirl" cookies :) I don't know their real name so I call them swirl cookies :D
I also made these twisted... things. And off course I used now my favourite sponge. So easy! :)


I still have much more things to make and recently I get lost  what I need more or not. I think I might have wrong way of creating things. It's like with my clothes shopping: I buy things I like without thinking and then I'm stucked with items that don't match each other. So now I'm worried that I will be left with deco that won't look good together :( I need to revise what I need and stop reading blogs for some time, not to get distracted. I just see things and I want to make them, forgetting about all the other sweets I was planning to make before. Total mess! But I am messy and chaotic :D Well, at least my room is after my crating.... ^_^'

Hope you enjoyed this post and thanks for looking!

Sunday 14 November 2010

Work in progress: new strawberries

Hi everyone!

Here's the latest update about my work. I've been making fruits recently (as well as many other things too).

So this will be quickie post with some photos of my rather proper strawberry halves. I know, not much to show at the moment, I'm sorry for that. I'm still in the process of making all the individual components, hopefully I will start putting them all together into whole pieces.


For many of you making strawberries may sound like a boring subject about which everyone has made post before. But in my opinion they are the main and a focal point of any creation. If the strawberry on top of your sundae or ice cream doesn't look right, the whole piece won't look realistic. Well, at least this is my opinion :) That's why I took my time and tried to make the best strawberries I can. And now it's up to you, my dear reader/follower to judge if I did a good job :)

Till the next tine and thanks for looking!

Tuesday 9 November 2010

Cherries, watermelon and market plans

Hey everyone!

I've noticed that most of the people who make deco sweets not only sell them on Internet like Etsy for example, but also at their local markets. It seems that it's quite common in Japan. I'm not an expert but almost every owner of the Japanese blog (and not only Japanese) I've read recently, has posted pictures of their market stands filled with amazing items. Being honest I've became a little bit jealous, not in a bad way, but more jealousy inspired by this fact. So I've done some research on the Internet and I've discovered quite a big market in my area and I'm planning to sell some of my items there. So far it's just an idea in my head. I would really like to do it at the end of December, so I would have about five weeks to make all the things I want to and from now on I will be working on the items I'd like to sell there. I've already started creating all the components and today I'd like to show you my cherries :)


I've made them using air dry Fimo clay and then painted with acrylic paint. I've tried to shade them a little at the top where the stem should be, but it didn't work out. Now I know why :) It's hard to do it with the brush and easier with powder sponge, which I've bought recently and I will try it out soon.


I wanted to cover them with normal varnish, but I decided to use something different to create this extra polish. I've mixed Lixuitex Gloss Medium&Varnish with a bit of red paint and painted cherries with it twice. After that I applied normal varnish.


To make stalks I used paper covered wires, which I bought at my local sugar craft store. The ends are made by just dipping them in acrylic paint. I will varnish them for extra protection (so they won't unwrapped themselves) after I attach them onto ready made items.


I've mentioned couple of posts earlier that I made some watermelon pieces and here they are. I used Sukerukun, stick Fimo seeds into it and then painted them with the same method  I used for cherries: gloss medium mixed with a bit of acrylic paint. I wanted to achieve glossy transparent effect.


Since I've decided to attend my local market I will have loads of work to do and I will probably won't show many ready made items, only separate components, like these cherries for example. I'm planning to make not only phone charms but also things like photo frames, clocks and other things, which I don't want to mention right now. I would like to surprise you a bit, although many people has probably deco-ed them already in the past :D

So now I'm off now to make some more fruits!  :)
Hope you enjoyed it and thanks for looking!

Saturday 6 November 2010

Whip cream mediums test

Hey everyone!

Like I said in one of my previous post, I have been trying to find new and better products to use as a whip cream. I really like silicone because it's relatively cheap and easy to buy, not like proper clay whip creams, which I have to have delivered from overseas (and that's expensive). But silicone doesn't hold the details and you can't varnish it.  Therefore I followed Tiff's advice and purchased four different brand modelling pastes. Yes, I know it was expensive :D It happened shortly after my disaster with Halloween cupcakes and it probably was a depression caused impulse :D I also bought two tubes of sealants: white Polyfilla and Unibond sealant. I forgot to take pictures of them so I just add links so you could see what kind of products they are.  I wanted to try a products similar to silicone but also being able to varnish them and glue deco items to it.

The most expensive modelling paste I bought were these two, Windsor & Newton brand. I was thinking to buy Liquitex brand, but I've read some reviews about it and apparently it cracks. The Artists' modelling paste costs about £9 for 237ml and Galeria is about £5, if I remember well (I'm too lazy to check my recite :D ).


Both of these pastes have creamy and light consistency like cream, which is what I was looking for. The Galeria was a little bit more fluffier than Artists' and I could compare it to whipped egg white :) It was really easy to pipe both of them, easier than Grace clay, similar to silicone.


The two other modelling pastes I bought were Marabu's brand and they cost around £5 each for 100ml pot. One is Light structure modeling paste and the other one is just a typical modelling paste. 


As you can see in the picture on the right, both of these pastes are grey and a bit grainy. They don't look like whip cream at all and that's why I didn't include them in my test. I don't know really what I will do with them. I couldn't be bothered to return them, so I might sell them on eBay or wait for some ideas.

The first product I've tried was an acrylic sealant. I bought it as a mistake about a week ago, thinking that I'm buying silicone sealant. I didn't read the label and I ended up with two tubes of it. I decided to try it out, but I didn't take any pictures of it. It took about a week to dry properly, and even after that time I could feel that the samples were still soft inside and I could easily squish it with my fingers and it had a bit grayish colour, not white. So the verdict is: not suitable for whip cream.

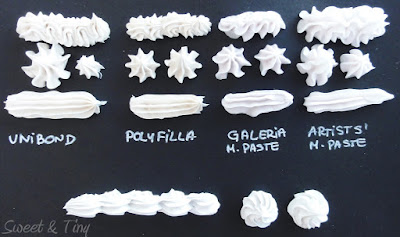
Here is my attempt to compare two modelling pastes and two sealants. The first thing that is really obvious is that two sealants are grey or even beige, in comparison with modelling pastes. They all keep they structures well and don't "melt". The Unibond, which had a bit of silicone in it's ingredients, was shiny and had a rubbery feeling. Polyfilla was mat and hard. Both modelling pastes were bright white and they kept their shape well.  I don't know if you can see it on the picture,but in reality I could see that Galeria became a little bit pinkish after a day of drying. It could be because of the black card (maybe the paint in the paper) which became wrinkled underneath both of these pastes.


I decided to check how these mediums will stick to other materials, so I applied all four of them onto plastic photo frame. I hope you can see which brands are they :) It's more obvious here that both sealants are beige not white, where both modelling pastes are ice white.  Well, after that I thought: Perfect! :) I also stuck some pearls into them to check how they will hold the decorations. All of them passed the test. The extra advantage is that you can apply a little bit of glue under every deco and you could be sure that they wont fall off. And you can apply varnish after drying for that super extra protection :)

Btw, these five dollops on the bottom right (and at the bottom of the picture above) are made from this unlucky acrylic sealant. It's not grey but it's not white either. I put them onto the frame when they were already dry and after a while I noticed that they glued themselves to it. That's the proof that this sealant doesn't dry very well.


Here is the close up of Unibond sealant. It keeps it's shape very well but ou can see how dark it is in comparison with modelling paste in the back.


And here you can see Galeria modelling paste closer. It's bright white but not shiny. I want to varnish it but I just couldn't wait much longer to post it. Yeah, I'm a bit lazy :D


I also wanted to know how these mediums will look on clay items. I've used air dry clay ice cream cones ans cupcakes. The ice creams are made with Unibond sealant and the cupcakes with one of the modelling pastes, I can't remember which one :D I'm sorry!


I have to say that I didn't bother with nice pattern on the cupcakes and I messed it up while applying the paste. The main point was if these mediums will hold the items and the metal loop, and also if they will stick properly to clay. They both passed my test :) I haven't varnished them and you can see that modelling paste is not shiny, but it still wins with the sealant because of it's colour.


So what are my thoughts after this little test? Well, I'm glad that I bought both modelling pastes, even if they were expensive. The prices are similar to Grace whip cream, but at least I don't have to wait weeks to receive my parcel, modelling paste is easy accessible in UK. I am not sure if modelling paste would be suitable for filling Sundays glasses with it, I don't know how thick layer you can apply and be sure it will dry inside. I might use silicone underneath and then top it up with modelling paste. I will definitely use modelling paste for frames etc. I might also use it for smaller items like jewelry, but for now I will stick with Grace clay as I have quite a bit of it in stock :D

I hope that I didn't make you bored after all of this comparing. Choosing the right product for a whip cream is crucial for me and probably for most of you. It has to look nice but also it has to be durable and not too expensive, as it is one of the main components in deco sweets crafts.

Thank you for reading this! :)

Thursday 4 November 2010

Last Sophie & Toffe free 10% discount code!

Hey guys!

This will be a quickie post. I've made a post some time ago about two referral codes from Sophie & Toffie that I have. Well I gave one away already and this lucky person can now make her first purchase with 10% discount! How cool is that? :D I still have another code so if anyone is interested please let me know and I will email it to you totally for free :)


Thanks for reading and have a nice weekend!

Tuesday 2 November 2010

Changes

Hello everyone!

As you can see I have changed design of my blog :) The previous version became too overwhelming with all the sidebars, buttons and extras. I think it is time for a change. I searched for some nice and clear Blogger templates because I am too lazy to create my own one in html, or (being honest) I don't really know how to do it and I have no time to learn now :) I will add a proper header soon and try to personalize it a little more, but for now I'm pretty happy with how it looks. I'd like to keep everything simple from now on. I think that people reading blogs don't want to search through tons of adds, buttons and other rather useless apps, to get to the things they are interested in.

I feel a bit guilty that I've removed links to all these brilliant blogs. I have to apologize all of you who where featured here. You were and still are my source of inspiration and here i would like to thank you all for what you have done for me, even without realizing it:) Your blogs were the first ones I found about deco from and it's also because of you and your art I started my deco crafting. I want you to know that just because I removed links to you websites or blogs, doesn't mean that I forgot about you. No, no :) So far it's just a thought in my head, but I would like to write about your blogs here. Not as a review, but to tell other readers who inspires me the most. I hope you won't mind :)

About my deco. I work full time, five days a week, therefore I have only evenings and two free days in a week to create things. I also try to have my daily dose of exercises every evening. I live with my boyfriend so you can imagine how much cleaning I have :) I can't say that I'm a busy person, but all of these things can take time and sometimes I haven't much of it left to craft as much as I want to. And sometimes I'm lazy :) But I would like to promise myself, and you, that i will craft and I will write about everything I do. I will try not to post about little and pointless things. I want to make posts about serious creations, not just to post anything, because it would be just blogging rubbish :) and that's why I can't promise you to post really often :)

I will also try to take nicer and brighter pictures. After changing the blog theme to brighter version I noticed how dark my photos are, even the ones taken with my new camera :) 

And the last thing. I am hasty person. I do everything quick. I eat quickly, I move quickly (bumping into things and people :). I also blog quickly without checking what I wrote, only with spell check. So here I would like to promise that I will try to write properly, as much as a foreign person can :D I really wish I could create beautiful sentences in English, but I just haven't got a lot of experience with this language even though I've been speaking English for over four years now. I remember how scared I was not being sure if I could manage writing here. I thought I would be able to create simple sentences, but somehow I did it and I'm happy that I didn't give up. All thanks to you who wanted to read and look at it all :)

These are my changes and promises to you for the future. I want to keep them and I hope that you will help me do it. 

And finally I would like to thank all of you who are following this blog and you who I can't see but are reading it.

Thank you :)  

Your Mini Mo
XXX